Gluten Free Recipes and DIY ideas fashioned by a Brunette.

Monday, December 2, 2013

DIY Brown Paper Wrapping Ideas

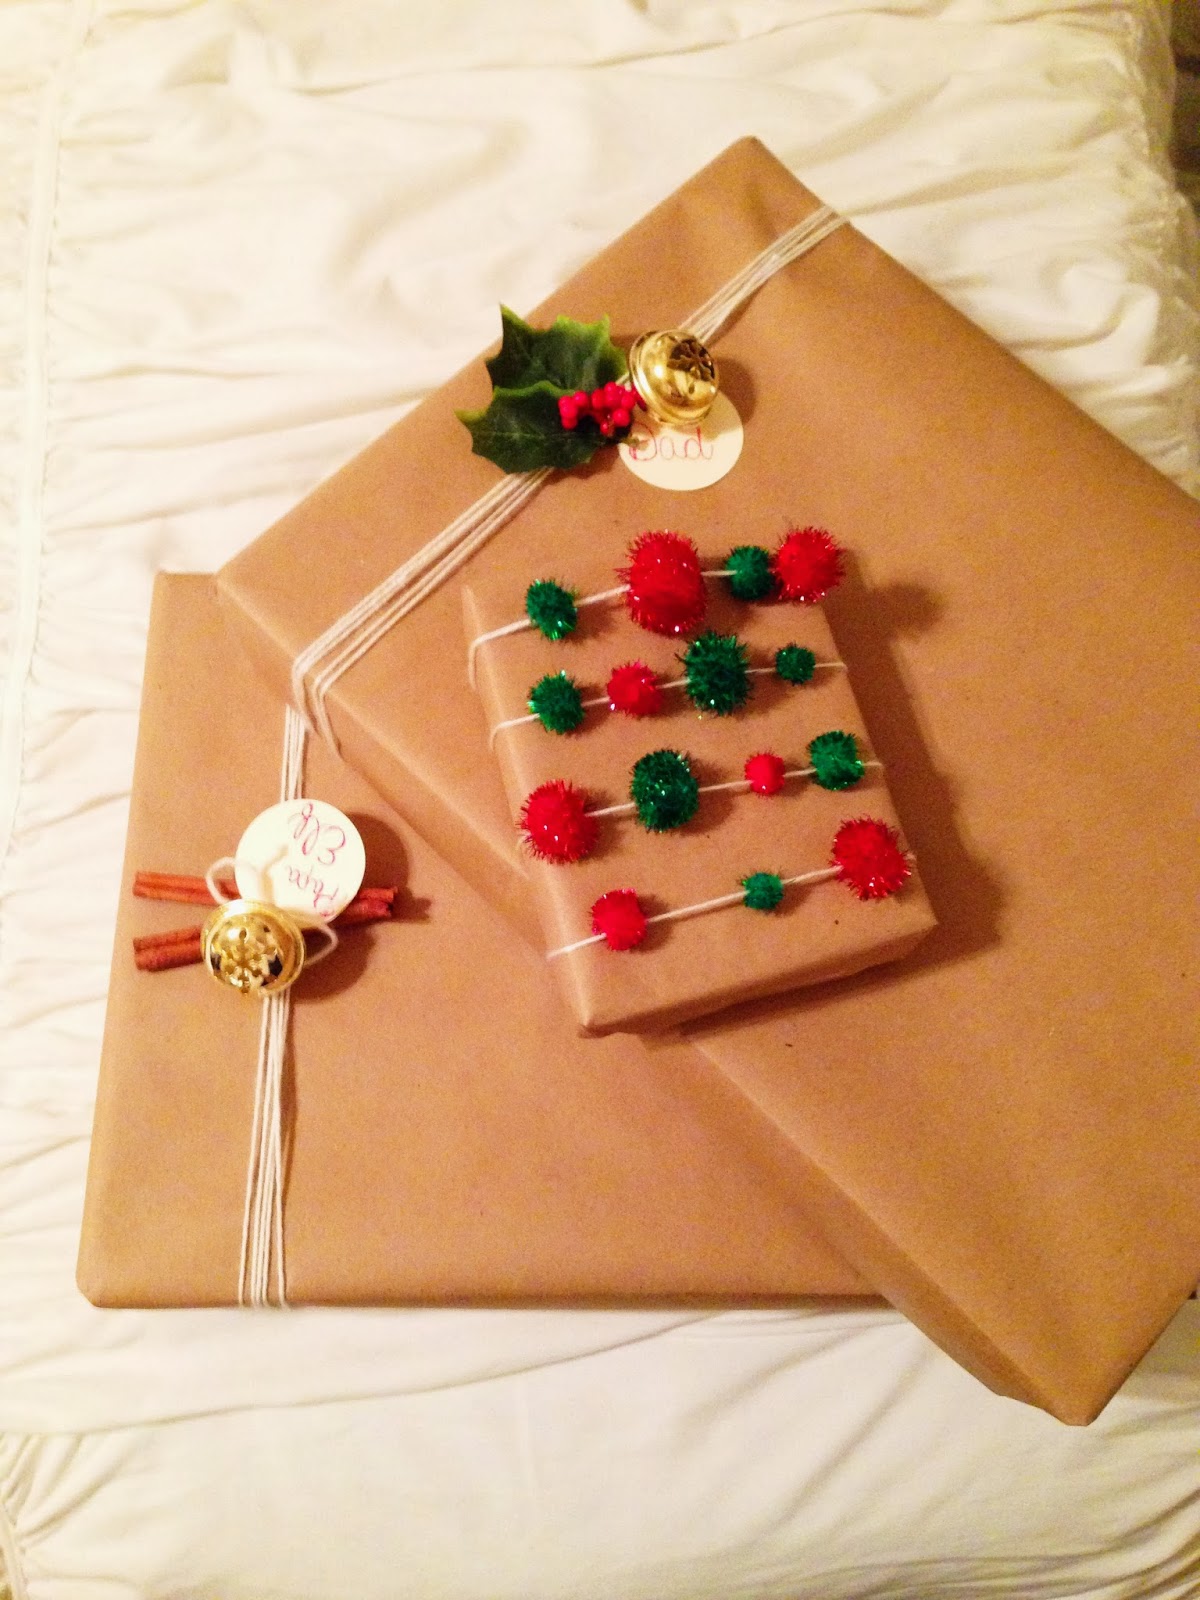
I cannot believe Christmas is so soon! This year I decided to get a little more creative with my gift wrapping but in an inexpensive way. I went to the dollar store and purchased plain brown wrapping paper and jazzed up each of my brown paper boxes with festive tie ons.Read below to learn how to make 3 different gift wrapping tie ons that I added to my brown boxes! Hope you enjoy! :)


Holly Berry Gift Wrap Tie On 


Supplies Needed:
  • Ivory Yarn
  • Large Gold Jingle Bells (I bought mine from Dollar Tree) 
  • Fake Holly florals (I bought mine from Dollar Tree)
  • Hot Glue gun
  • Blank Circle cardstock Tags
Directions:
Step 1: Wrap your gift in your brown wrapping paper. Cut a piece of yarn long enough to wrap around your box 4-5 times.

Step 2: String a jingle bell onto the very end of the piece of yarn, then string your circle tag (with the filled out name written on it). Wrap your yarn around the box until both ends meet in the middle of your box. [see photo below]

Step 3: Cut a piece of holly from your fake floral piece, place one of the holly leaves above the yarn and one leaf under the yarn so it lays flat on your wrapping paper, placing the leaves in the middle of your box near the loose ends of the yarn. Carefully hot glue down the leaf laying flat on your wrapping paper. [see photo below]

Step 4: Take your ends of the yarn and tie the bell & tag directly next to your holly leaves. Double knot your yarn so it is secure and cut any loose ends. Your tie on is now complete!

<---Step 2                                                Step 3--->


Cinnamon Stick Gift Wrap Tie-On


Supplies Needed:
  • Ivory Yarn
  • Cinnamon Sticks (I bought a bag for $1 at Hobby Lobby)
  • Large Gold Jingle Bell
  • Hot Glue Gun
  • Blank Circle Card stock Tags
Directions:
Step 1: Cut a piece of yarn long enough to wrap around your box 4-5 times. 

Step 2: String a jingle bell onto the very end of the piece of yarn, then string your circle tag (with the filled out name written on it). Wrap your yarn around the box until both ends meet in the middle of your box. [see photo below]

Step 3: Take two cinnamon sticks and hot glue them together, then glue them flat onto your wrapping paper in the middle of your box placing the sticks on top of your yarn but leaving the loose ends of the yarn out.  [see photos below]

Step 4: Take your ends of the yarn and tie the bell & tag directly on top of your glued down cinnamon sticks. Double your yarn so the bell and tag are secure. Yay! 


Pom-Pom Tie-On


Supplies Needed:

  • Ivory Yarn
  • Tinsel Green & Red colored poms poms of various sizes
  • Embroidery needle
  • Tape
Directions:
Step 1: Cut a piece of yarn long enough to wrap around your box 4-5 times (depending on size of the box) 

Step 2: Thread one end of your yarn into the embroidery needle about an 1.5 inches down, fold over the yarn. [see photo below]

Step 3: Pierce poms-poms with your embroidery needle and string them down to the end of your yarn, continue to string pom-poms until you have a good amount on your string. [see photos below]

Step 4: Remove your needle and tape that end of the yarn to the back of the box. Roll your yarn to the front of the box and move the pom-poms along your string of yarn to have some on top of your box, spacing the pom-poms apart. [see photo below]

Step 5: After you have completed a row of pom-poms on top of your box wrap the yarn to the back of the box, then wrap the yarn around to the front of the box and move your pom-poms along the string of yarn to the top of your box again. Repeat this step until you have enough rows of pom-poms covering the front of your box. Once you're done covering the front of the box with the pom-poms, tuck the end of the yarn on the back of the box and tape it down. Yay!  [see photos below]


Read More

Monday, November 25, 2013

DIY Fall Votive Mason Jars- A Thanksgiving Centerpiece

I love mason jars! They are perfect as candle votive holders and placing a few jars together makes a perfect table centerpiece. Below I show you how to create a Fall look with your mason jars that can be used as a simple and elegant centerpiece for your Thanksgiving table. Hope you enjoy!

DIY Fall Votive Mason Jars


 Supplies Needed:

  • 3 mason jars (I bought mine at Dollar Tree)
  • 3 ivory votive candles
  • Brown Spanish Moss
  • Ivory Twine
  • Fake floral berries (I found mine on the arrangements that my fall leaves from above were on) 


Directions:
  1. Unscrew the lids off your mason jars, remove the center canning parts and keep only the rim to screw back onto the top of your jar. 
  2. Cut three sections of berries 1.5-2 inches long from your floral arrangement. Cut three pieces of 3-4 feet of twine. 
  3. Make sure your lids are off your jar and grab a handful of spanish moss and stuff it into each one of your jars. In the center of the moss, burrow a small hole where you can put your votive candle so it will sit up straight and evenly.
  4. Once all jars have moss and votive candles situated in them, screw your lids (without the center) back onto the jars. Grab one piece of twine and wrap it around the gold rim of your mason jar holding one edge of the twine in your hand, after you have wrapped it around where now the other edge of the twine meets, tie a loose knot with 1 inch of space between your knot and the lid of the jar. 
  5. Place one section of berries into the space between the jar lid and knot. Now grab the ends of your knot, pulling the berries onto the jar lid very tightly. Tie another knot so the berries are securely fastened to the jar lid. Cut any remaining ends of the knot. Repeat with remaining jars. 
  6. Once all jars have berries and twine fastened to them,  light your candles and place jars where desired to enjoy! :) 
Pictured below: 1-burrowed moss with votive candle in it,  2-berries left on fall arrangement that I cut into sections to use, 3- completed fall votive mason jar 


Read More

DIY Glitter Fall Leaves

For Thanksgiving I always love to make the dinner table festive with Rich Fall hues before we have to jump right into Winter! For my Thanksgiving table setting I purchased an ivory colored table cloth and a roll of Burlap Ribbon that I placed across the middle of my table, to draw just the right amount of attention to the center. The burlap ribbon is a subtle color and allows you to place a centerpiece of your choice in the middle.  Whether you're placing a vase full of Fall flowers, a pumpkin or candle arrangement in the middle of your table the burlap ribbon makes for a perfect table runner. Here are instructions for how to make fake glitter leaves; these are perfect to toss onto your Thanksgiving table and add just enough sparkle to jazz up your table setting!

DIY Glitter Fall Leaves 


Supplies Needed:

  • Fake floral leaves 
  • Mod Podge
  • Sponge Brush
  • 3 different colors of extra fine glitter 


Directions: 
  1. Cut your desired fall leaves from fake flower arrangements and lay them out on a covered surface.
  2. Using sponge brush,  paint surface of a leaf with mod podge. 
  3. Pour extra fine glitter onto the mod podge covered surface of leaf. Repeat with remaining leaves, changing up the glitter color until all leaves are glittered. Let leaves sit for 15 minutes.
  4. After leaves have sat for 15 minutes, pick leaves up and shake the loose glitter off onto your covered surface. 
  5. Let leaves dry for 2 hours until the glue has fully dried, before placing the leaves on your set table be sure to shake them once more for any loose glitter. (If you don't want to worry about any loose glitter falling off your leaves you can always paint another coat of mod podge over the glitter layer to seal it all in; just make sure you decide to do this a good amount of time in advance before your dinner so that the top coat covering the glitter can fully dry.) 
Pictured below: 1-Remove fake leaves, 2-coat leaf with mod podge, 3-cover mod podge surface with glitter

Read More

Wednesday, November 6, 2013

Gluten Free Chicken Pot Pie Recipe

Here is another classic comfort food recipe gone gluten free that I experimented with! This is one of mine and my families favorites, hope you enjoy!

Easy Gluten Free Chicken Pot Pie


Ingredients:
  • 2 cups chopped cooked chicken breast (It's easiest and personally I think its yummier to get a rotisserie chicken and use that!)
  • 1 bag of Organic Foursome frozen Vegetables from Trader Joe's (includes organic peas, cut green beans, carrots and corn)
  • 1 (10, 3/4 ounce) can cream of chicken soup
  • 1 cup chicken broth
  • 1 1/2 cups Gluten Free Bisquick mix
  • 1 cup milk 
  • 1/2 stick melted butter
Directions:
Preheat oven to 350 degrees
Step 1: Grease a 2 quart casserole dish. Layer or mix up the chicken and frozen vegetables in the dish.

Step 2: In a separate bowl mix together cream of chicken soup and chicken broth. Pour mixture over chicken and frozen vegetables in your casserole dish. 

Step 3: In another bowl mix together the gluten free Bisquick mix and milk. Pour this mixture over the chicken, vegetables, chicken broth and cream mixture that is in your dish.  

Step 4: Once your casserole dish is covered with the Bisquick + Milk mixture, drizzle the melted butter over the top. Place dish in your heated oven and bake for 60 minutes, or until top is golden brown. 
Read More

Gluten Free Macaroni & Cheese Recipe

As the weather is progressively getting cooler, I always crave something warm and delicious for dinner. So after experimenting in the kitchen a bit I decided to post some gluten free comfort food recipes. All of them are delicious, easy and perfect for those chilly nights. I hope you enjoy this tasty gluten free for an all american dish....macaroni & cheese!

The Yummiest gluten free Macaroni & Cheese


Ingredients: (serves 4 as a side dish)
  • 2 cups dry gluten free elbow macaroni or penne pasta (I have made both kinds of pasta and they are equally as delicious, I purchased both pastas from my local Safeway) 
  • 8 ounces Original Velveeta cheese
  • 1/2 cup heavy cream
  • 1 teaspoon salt
Directions:
Step 1: In a large pot, boil water and cook your pasta according to packages instructions. 

Step 2: Cut/cube Velveeta cheese into small pieces, place the cubed  Velveeta cheese in a small saucepan. Add heavy cream and salt to the saucepan, stir ingredients together. 

Step 3: Turn saucepans heat on low, stir cheese and cream together until cheese cubes are melted. Reduce heat once the cheese is melted. 

Step 4: When your gluten free pasta is done, drain pasta and place it back into the pot you cooked it in. Add your cheese sauce to the pot of pasta and stir. Coat all noodles with sauce, serve and enjoy! 


Read More

Thursday, October 24, 2013

Twice Baked Sweet Potato Recipe

Last night I was planning to make a large chopped salad for dinner and thought I needed a something to go with it;  so while I was at the market I decided to grab some sweet potatoes and thought I'd figure out what to do with them when I got home. I personally love sweet potatoes because they remind me of fall and have many health benefits! So I came up with this easy recipe for twice baked SWEET potatoes and they turned out to be super delicious!  Hope you enjoy!

Twice Baked Sweet Potatoes

Ingredients (serves 4)
  • 2 sweet potatoes
  • 2 1/2 Tablespoons butter
  • 1 Tablespoon chopped dried cranberries
  • 2 Tablespoons chopped almonds
  • 1 Teaspoon cinnamon
Directions:
Step 1: Poke your two sweet potatoes all over with a fork and place on a microwave safe plate covered with a paper towel and place them in the microwave for 7 minutes. 

Step 2: Remove your sweet potatoes from the microwave and slice each of them in half. Using a spoon, carefully scoop out the inside of one of the halves and place the inside of the potato in a medium sized bowl. Clean out the inside of the potato half leaving a thin layer of potato along the inside of the skin. Repeat this process with the remaining halves. Place your empty halves on a cookie sheet. 

Step 3: Use a fork to mash up the inside of your potatoes that you placed in the medium bowl, mash potatoes until they resemble a smooth texture. Add in the butter, cranberries, almonds, cinnamon and stir mixture until ingredients are all blended together.

Step 4: Take your mashed sweet potato mixture and using a small spoon, scoop the mixture into each of the empty halves on your cookie sheet. Scoop the mixture in the halves until all of the mixture is gone.  Once your potato halves are filled, you can refrigerate them (for up to 24 hours) to cook later or place them in a preheated 350 degree oven to cook. Cook the potato halves for 30 minutes. Once they have cooked, serve and enjoy!  

Sweet Potato Health Benefits:
Massive amounts of Antioxidants
Contain twice the amount of fiber compared to regular potatoes
Rich in Vitamin C & E 
Potent source of Maganese (helps stabilize blood glucose levels and appetite for hours)
High levels of B6 and Potassium
The tubers also contain iron, magnesium and Vitamin D
Soothing for the stomach
Read More

Wednesday, October 23, 2013

Recipes from my Pumpkin Carving Party

This weekend myself & my roommates had our second pumpkin carving party. We set up tables covered with plastic table cloths (makes clean up super easy), tea light candles for our guests to put in their pumpkins, plastic gloves so our guests don't have to get dirty when cleaning out the pumpkin guts and we placed many decorated paper bags that contained carving supplies in them. All we asked of our guests is that they bring their own pumpkin and we provide everything else including yummy gluten-free treats and cocktails! Once everyone was done carving their pumpkins we had a bonfire in the back yard with s'mores. It's perfect since the nights have been getting cooler. Thought I would share with you some of the gluten-free favorites from our party,  hope you enjoy!


Something Salty...
Warm Chili Cheese Dip Recipe
  Ingredients:
  • One big block of Kraft Velveeta Cheese (32 oz)
  • One Can of Hormel Chili with Beans
  • 3/4 pound of drained, cooked turkey meat
  • Tortilla Chips
Directions:
Step 1: Cut your Velveeta cheese into small squares and place in a crock pot.

Step 2: Open can of Hormel chili With beans and drain just a little bit so the juices on top drain out. Pour the can into the crock pot on top of velveeta cheese. 

Step 3: After you have drained and cooked your turkey meat place it in the crock pot with cheese and chili. Place the crock pot lid on top of the ingredients and turn crock pot on low; be sure to stir the dip often(about every 40 minutes) and check that it's not burning on the sides! 

Step 4: Once the ingredients have cooked together and the cheese has melted to become a smooth, dip-like consistency it's ready to eat!  Keep crock pot on low or turn it off for your guests to enjoy warm and yummy dip. Serve with tortilla chips & enjoy! 

Something Sweet...
Mini Caramel Apples
  Ingredients:
  • Miniature Organic Granny Smith Apples from Trader Joe's, they come in a bag containing 10 for only $2.49
  • 1-2 bags of square caramel candies
  • 2 tablespoons of milk
  • 1 wooden skewer
  • 12-15 lollipop sticks (4.5'')
  • Parchment paper
  • Cookie sheet or large serving platter
Directions:
Step 1: Unwrap all of your caramel candies and place them in a double boiler pot on top of the oven on medium-high heat. Add 2 tablespoons of milk to the caramel. Carefully continue to stir the caramels. 

Step 2: While the caramels are cooking, take your mini apples out of the bag and remove the stems. Once all the stems have been removed, insert the wooden skewer into the top of the apple where the stem was, pushing it deep into the apple;  remove the skewer and place a lollipop stick where the skewer was. Place your apple with the lollipop stick to the side. Repeat this process with remaining apples. 

Step 3: Cover cookie sheet with parchment paper. Place your apples with lollipop sticks on to the parchment covered pan. Once your caramels are completely melted into a liquid consistency, pour the caramel into a tall bowl. Take your apples and dip them into the caramel shaking them to remove the excess caramel layer thats at the bottom of the apple. Place the caramel covered apple onto the parchment paper covered pan. Repeat this process with remaining apples until all apples are covered in caramel. If the caramel becomes thick near the end place it in the microwave for 30-60 seconds so it becomes thinner and easier to dip the apples in. 

Step 4: Once you have dipped all your apples in the caramel, carefully cover the apples on the pan with plastic saran wrap and place the apples in your refrigerator so the caramel hardens onto the apples. When you are ready to serve them, remove the apples from the parchment paper and place on whichever plate you desire to serve them on and enjoy! 

& Something Bubbly..
Champagne + Spiced Cider
Ingredients:
  • Brut Champagne
  • Spiced Cider from Trader Joe's
  • Empty clear wine bottle 
  • Funnel
Directions:
Step 1: Right before your guests arrive pour champagne through the funnel into the clear glass bottle. Be patient as the champagne bubbles out, fill the clear glass bottle 3/4 full. 

Step 2: Shake up the spiced cider, using the funnel pour the spiced cider into the clear glass bottle entirely filling up the bottle to the top. Do not shake the mixture! Pour into glasses and enjoy! 
Read More

Sunday, October 6, 2013

Gluten Free Pumpkin Nut Bread

I love the fall season & everything about it! My favorite thing about fall is being able to bake in the kitchen without over heating the house and filling the house with delicious smells! Growing up I always remember my Mom would make pumpkin bread. It smelled delicious while it was baking in the oven and was perfect for breakfast or dessert! She would heat it up in the microwave for 10 seconds with a little butter on top and it tasted fresh out of the oven! So today I pulled out the family cook book and decided to make it, but substitute a few things so it was gluten free! Hope you enjoy!

Gluten Free Pumpkin Bread


Ingredients:

  • 2 cup gluten free all-purpose flour (I used Trader Joes brand)
  • 2 tsp. baking powder
  • 1/2 tsp. baking soda
  • 1 tsp ground cinnamon
  • 1/2 tsp. ground nutmeg
  • 1/2 tsp. salt
  • 1 Cup pumpkin puree
  • 1 Cup granulated sugar
  • 1/2 Cup milk
  • 2 eggs
  • 1/4 Cup butter or margarine softened
  • 1/2 Cup chopped pecans 

Directions:
Preheat oven to 350 degrees. Grease a 9x5x3 inch loaf pan.

Step 1: On a sheet of waxed paper or in a bowl sift together the flour, baking powder, baking soda, cinnamon, nutmeg and salt; set aside. 

Step 2: In a large bowl combine pumpkin, granulated sugar, milk, eggs and butter, beat until well blended.

Step 3: Add flour mixture to pumpkin mixture, beating just until smooth. Stir in chopped pecans. 

Step 4: Pour batter into prepared pan. Bake 50 to 60 minutes or until cake tester comes out clean. Cool in pan 10 minutes. Remove from pan. Sprinkle with confectioner's sugar if desired. Slice and enjoy!
Read More

Saturday, October 5, 2013

Gluten Free Skinny Pancake Recipe

I stumbled across this recipe and had to share it with you! I love breakfast but most gluten free pancake mixes I've had are heavy and very filling. These pancakes are super easy to make, delicious, gluten free, dairy free and healthy!

Gluten Free Skinny Pancakes
Ingredients: 
(For one serving of 3 small pancakes)
• 2 egg whites
• 1/2 cup uncooked oats
• 1/2 banana
• 1 teaspoon vanilla 

Directions:
Step 1: Place ingredients in a blender, and blend for 30-60 seconds until all ingredients are well mixed into a batter consistency

Step 2: Pour 1/3 of batter onto greased griddle or large pan on medium heat, flipping over the pancake until both sides are slightly brown. Repeat until all batter is gone. 

Step 3: Serve with desired toppings and enjoy! 

Note: I placed my batter in a plastic baking squeeze bottle to make my pancakes pretty and have a fun design! 

Read More

Friday, October 4, 2013

DIY Halloween Banner

Last year my roommates and I had a pumpkin carving party. Out guests brought their own pumpkins and we provided all carving supplies, along with yummy treats and fall cocktails! It was a ton of fun and we decided to make it an annual event! The other day I was browsing hobby lobby and came across this plain brown paper mâché banner that said "Halloween" as soon as I saw it, I thought it would look great hovering above our appetizer/cocktail table at the pumpkin carving party, but I needed to jazz it up a bit...so I did exactly that! Read below to see how I made my plain banner festive and fun!

Follow the blog to watch my pumpkin carving party come together, so that you too can have your very own pumpkin carving party for friends and family!

Supplies:
•Paper mâché banner from hobby lobby
•Light orange acrylic paint
•Extra fine copper colored glitter
•Mod Podge
•Small paint brush
•Medium paint brush
•Paper plate


Directions:
Step 1: Layout the banner across a covered surface, I covered mine with an unfolded paper grocery bag. 

Step 2: Squeeze a decent amount of your orange paint onto the paper plate, Using your medium paint brush, paint even strokes covering each of the letters, avoid painting the string that attaches the letters together. Paint as many coats as you find necessary (I did 3 coats per letter) After you complete your coats rinse your paint brush, ridding all of the paint from the bristles. 

Step 3: After the paint has completely dried on your letters (about 30 minutes) Use the small paint brush, dip it into the jar of mod Podge and paint the edges of your first letter. It's okay if it doesn't look perfectly straight! That's the point! After you finish painting the edges of your first letter, generously sprinkle the extra fine glitter where you painted the mod Podge, ensuring you don't miss any spots. Repeat this process with every letter.

Step 4: After you have finished completing step 3 on every letter, carefully pick up your banner and sprinkle all of the loose glitter off of it. Once all your loose glitter has came off, use your medium brush to paint a layer of mod Podge over each letter, sealing in all of the glitter. Let it dry for 4 hours or until mod Podge layer has dried clear.

Once your letters have dried, your banner is now ready to hang and beautifully display! 


Read More

Tuesday, October 1, 2013

DIY metallic & glitter mason jars

As lame as it sounds I love storage and organization. In my bathroom I have large glass canisters you would typically find in a kitchen for storage but I use mine to store cotton balls and the other to store Q-tips. I use these items daily for cleaning up makeup, applying toner, etc.  so it's essential that I can access them easily! I've been staring at these boring jars for awhile and decided I needed to do something different, so I took a trip to hobby lobby and purchased some new jars. I ended up finding some large, wide mouth mason jars for only $2.49 each...what a steal! But I decided to jazz my mason jars up and ended up making one metallic silver and the other dazzling with silver glitter. I love how they turned out, the jars hide my cotton balls and Q-tips but look super cute and add a touch of sparkle to my bathroom :) You could use these jars in many different ways; I find them perfect to store pocket change, makeup brushes, hair barrettes, etc. However you decide to put your dazzling jars to use... I hope you enjoy this post!


Supplies Needed: 

  • Two large, wide-mouth glass mason jar (or whichever sized mason jar you choose to use)
  • One bottle of metallic silver acrylic paint (or color of your choice)
  • One medium sized paint brush
  • One foam brush
  • Bottle of glossy mod podge
  • Silver glitter (or color of your choice)
Directions for Metallic Jar:
  1. Take the lid off of your jar and squeeze some paint into the bottom of the jar. 
  2. Using your paint brush, brush the paint all around the interior of the jar, coating all the sides and areas of the jar in even strokes. Look at the outside to see if you missed any spots. 
  3. Once you have completely coated the inside of the jar with paint, let the jar dry for 4 hours. 
  4. Check on your jar after the 4 hours and if you still see spots missing paint, repeat steps 1-3 again. Then your jar should be completely metallic colored and ready to use! 
  5. **If you are using your Jar to store food, you will want to spray the inside with a clear protective glaze like this one by Krylon (<-- click here)**


Directions for Glitter Jar:
  1. Using your foam brush, dip it into the mod podge and spread an even coat of mod podge all over the outside of your other jar. Be careful to not paint mod podge on the mouth of the jar!
  2. Over a covered surface take your glitter and sprinkle it all over the outside of your jar, covering all spots of the mod podge. Rinse out the mod podge from your foam brush and let it dry.
  3. Once you have completely covered the outside of your jar, let it sit for 45 minutes. After you have let it sit for 35 minutes, pick up your jar and shake off any loose glitter.
  4. After shaking off the loose glitter, take your foam brush and paint an even coat of mod podge over your layer of glitter covering all spots of glitter. After you have covered the entire outside of your jar let it sit for 4 hours or until this layer of mod podge dries clear.
  5. After you have let the outside of your jar dry clear, your layer of glitter is now sealed shut and your glitter jar is ready to use! 

Read More

Saturday, September 28, 2013

Gluten Free Baker's German Chocolate Cake Recipe

Yesterday was my Dad's birthday and no birthday is complete without the cake! Growing up as a kid, my Grandmother used to make my Dad his favorite German Chocolate cake for his birthday every year. My Grandma lives across the country, so I unfortunately don't see her too often but I remember when I was in high school she visited us and she made him his favorite German chocolate cake. At that age I was always interested to see what was going on in the kitchen, but I had no desire to bake or cook; I remember always wondering why my Grandma didn't make him a boxed cake mix because a boxed cake mix would be so much easier to prepare than this homemade cake. I watched her in the kitchen spend lots of time making this cake and remember thinking "goodness, preparing this cake takes a lot of time!" Now that I have grown to love cooking and baking in the kitchen, I decided to make my Dad his favorite birthday cake that he grew up having every year. I wanted to enjoy this cake as well, so I had to make it gluten free. I changed the recipe a bit but made it gluten free. I was nervous the cake wouldn't turn out as amazing and delicious as my Grandma's was but much to my surprise it was delicious! In the past I've felt that when I bake with gluten free flour my baked goods turn out to be very dense and their not as moist as normal baked goods with gluten are, but this cake was perfect!

      My Grandma used the recipe inside the Baker's Sweet German Chocolate bar box, but the recipe inside the box is now tailored to bake cupcakes. After researching, I found the recipe on Kraft and it makes a 3 layer German chocolate cake. My Grandma makes her German Chocolate Cake in a 13 x 9 dish with frosting on top. I decided to make my dads as a 2 layer and this was the perfect amount. I used two 8 inch pans. You don't want to frost the sides because the cake is super rich as it is already with the frosting between the layers! This gluten free cake hits the spot, it's nice and light but delicious and sweet! Hope you enjoy this recipe!

Gluten Free Baker's German Chocolate Cake Recipe:
 Ingredients:
  • 1 package (4 oz.) Baker's sweet german chocolate
  • 1/2 cup water
  • 4 eggs, separated
  • 2 cups Red Mill's All Purpose gluten free baking flour
  • 1 tsp. baking soda
  • 1/4 tsp. salt
  • 1 cup salted butter, softened
  • 2 cups sugar
  • 1 tsp. vanilla
  • 1 cup buttermilk


Heat oven to 350 degrees

Step 1: Cover bottoms of your 8/9 inch pans with wax paper and grease sides of pans. Microwave chocolate with 1/2 cup water in bowl 1 to 1 1/2 minutes or until chocolate is completely melted, stir after they have microwaved for 1 minute and stir until chocolate is completely melted.

Step 2: Beat 4 egg whites in bowl with mixer on high until stiff peaks form, set aside. In a separate bowl mix 2 cups flour, 1 tsp. baking soda and 1/4 tsp. salt. In another separate large bowl beat your 1 cup softened butter with 2 cups sugar until mixture is light and fluffy. Add your 4 egg yolks, 1 at a time, beating well after each. Blend in melted chocolate and vanilla. Slowly add your flour mixture alternately with buttermilk, beating until well blended after each addition.

Step 3: Add egg whites, stirring gently until well blended. Pour into prepared pans. You may have some batter left over.

Step 4: Bake for 30 minutes or until toothpick inserted comes out clean. Immediately run small spatula around cakes in pans. Let cakes cool in their pans for 20 minutes, remove and let them cool on wire rack or wax paper on flat surface
Coconut Pecan Frosting Recipe:
  • 4 egg yolks
  • 1 can evaporated milk (12 oz.)
  • 1&1/2 tsp. vanilla
  • 1&1/2 cups sugar
  • 3/4 cup margarine
  • 3 cups coconut flakes
  • 1&1/2 cups chopped pecans
Step 1: Beat 4 egg yolks, evaporated milk and vanilla in large sauce pan with fork or whisk until well blended. Add 1&1/2 cups sugar and 3/4 cup margarine; stirring constantly, cook on medium heat for 10-12 minutes until mixture is thickened and golden brown color. Remove from heat
Step 2: Add 3 cups coconut and 1&1/2 cups pecans, mix well. Let your frosting sit and cool until it reaches desired thickness/consistency.
Frost top of one of your cakes with frosting, spreading the frosting with a thick layer. Place other cake on top and frost the top of it. Serve and Enjoy!
Read More

Friday, September 20, 2013

DIY Smoothie In a Bag!

Have you ever been in a rush out the door one morning and don't have time to grab breakfast or whip up a delicious fresh smoothie? I know when I have been in a time crunch, I'm focused on making sure my outfits perfect and my hair and makeup are finished rather than worrying about eating. But Breakfast is the most important meal of the day & gives you the nutrients you need to be alert for the rest of the day! So instead of wasting your time in the morning cutting your fruits & vegetables and picking out what ingredients you want to put in your smoothie, I made these smoothie bags! Haven't you ever seen the smoothie bags in the frozen section of your grocery store by yoplait yogurt or Jamba Juice?...These smoothie bags are kind of like those but you get to choose what ingredients you want in your smoothie!  I put these smoothie bags in the freezer which helps keep my ingredients fresh and makes my shakes nice & cold! They're super easy to make and save so much time when you're on the go, just throw one of your bags in a blender, blend it up, pour into a glass and enjoy! 


Here's what you need: 
•Fresh fruit
•Fresh Vegetables
•Large ziplock bags
•Permanent marker

After you take a trip to the market and load up on vegetables and fruits, chop up your fruits and vegetables that you want to make smoothies with. Come up with a few different smoothies you want to make & put the ingredients for one serving in each of the ziplock bags. For example in one bag I put 1 cup spinach in a bag, 2 skinned and sliced kiwi & a 1/2 cup mandarin oranges in one. With the permanent marker I wrote what ingredients were in my bag and also wrote "ADD:" listing what liquid I wanted to add to my smoothie bag when I'm ready to blend it (my liquid was coconut water) Be sure to write the date on your bag too so you don't blend up old fruits! [Yucky!] I hope these smoothie bags help give you a yummy & quick breakfast when you're in a rush! 
Read More

Wednesday, September 18, 2013

Pumpkin Pie Smoothie

The Fall season is less than a week away and I cannot wait! I love everything about the season but most of all I love the amazing food and warm scents that comes with it. I concocted a delicious and healthy Pumpkin Pie smoothie that is perfect for you to drink up for breakfast during those crisp autumn mornings. Let me know what you think :)

Pumpkin Pie Smoothie
 Ingredients:
•2/3 cup of pumpkin purée 
•Half frozen banana
•1/4 cup vanilla yogurt
•1/4 cup almond milk
•Sprinkle of cinnamon
•Sprinkle of nutmeg 
•1-2 drops of honey
(Serving size 1) 

Place the frozen banana into your blender first & then add remaining ingredients. Blend for a few minutes until a frothy consistency is made. Pour into a glass and enjoy! 
Read More

Meet the Brunette Blogger...

Powered by Blogger.

© The Brunette Bible, AllRightsReserved.

Designed by ScreenWritersArena